Applying nails at home is cheaper and more convenient, but it’s essential to know how to maintain them properly. For example, you might not have all the high-tech tools a salon has, so how do you file acrylic nails without an electric file?

To file acrylic nails without an electric file, you first want to soften the sides of your nails, decide your preferred length, file the top of your nail, smooth and shine your nails, and finish by cleaning your nails and hands.
Do You Need An Electric File To Do Acrylic Nails?
You don’t need an electric file to shape and buff your acrylic nails properly. While electric files are handy, if you don’t visit a salon, you may not have one accessible to you.
In addition, not using an electric file gives you more control over the filing process, as electric ones can sometimes file your nails too much.
Electric files can be expensive, and you don’t need them to achieve your desired look.
Do You Need to File Acrylic Nails?
Once you set your acrylics, do you need to file them like natural nails? First, you want to file your acrylics as your natural nail continues to grow. While you should ensure you have fill-ins, your nails will get longer if you don’t file them.
You must carefully file and shape your acrylics because you are stuck with your end shape once finished. If you don’t like the outcome, you’ll have to wait until your next appointment.
Expect acrylics to last anywhere between six to eight weeks with an in-fill appointment every two to three weeks.
How To File Acrylic Nails Without Electric File
You don’t need an electric file to keep your acrylic nails looking good. However, there are several steps to follow if you file acrylic nails without an electric file:
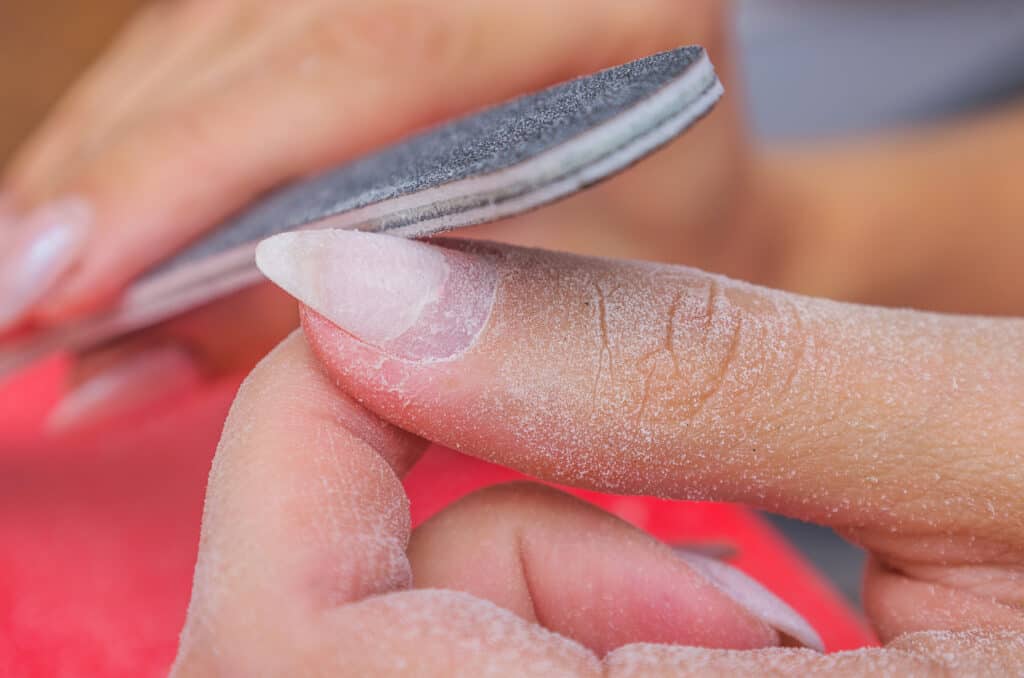
1. Soften the Sides of Your Nail File
The edges and corners of a new nail file can be rough, and you can slice the side of your finger. Scoring, as it’s called, helps prepare your nail file for use.
While glass emery boards don’t require scoring, they are recommended for natural nails and aren’t the best fit for acrylics.
2. Find Free Edges of Nails
You will find free edges on the sides of your nails where you want to file up and down.
You can file back and forth on acrylics, which you don’t want to do to natural nails. If you hold the bottom of your finger, you’ll get a good grip and easily be able to file back and forth.
The shorter you file your nail, the thicker the acrylics will become. So while you don’t want it to remain thick, it’s a sign you are doing it correctly.
3. Decide How Long You Want Your Nails
First, you want to know your desired length. Once you start shaping, there isn’t going back. It’s always best to start small and decide if you want to shape your nails further.
For example, if you want a square shape, you will begin shaping at this point.
4. Begin Filing the Top of Your Nail
First, you want to ensure you are gently filing around your cuticle to prevent damage to your skin. Next, file on each side of the nail before working on the middle. Also, you want to keep the arch point of your nail looking the highest.
You will notice the thickness diminishing, so you want to keep filing until the curve of your nail is to your preference.
The curvier at the end, the more strength your nail will have. Don’t be afraid to rotate your finger as necessary while filing.
Remember, this process can take some time, so don’t try to rush it. So before finishing, you want to go over the whole nail to smooth things out.
5. Use a Smooth Grit to Finish Your Nails
Before you finish, use a smooth grit to finish off your nails. You want to go over the entire nail to ensure you missed no parts. Your nails will still feel rough after this part, but the final step will help.
6. Shine Your Nails
You want to use a nail file with four parts (file, buff, polish, and shine) to complete your nail filing.
Follow the steps in order, and finish with the fourth side to help shine your nails, which will smooth things out completely.
The ends of your nails should be even and shouldn’t be too thick. If your nails aren’t where you’d like them, file down any uneven or rough edges.
Filing acrylic nails takes practice, and you’ll likely need to do touch-ups before you are pleased.
7. Clean Your Nails And Hands When Finished
Even if you aren’t using an electric file, filing can produce a good amount of dust, so you always want to wash your hands when finished.
You also want your nails clean and dry before applying nail polish.
Unfortunately, dust can irritate the skin or bother you if inhaled. The tiny particles you may breathe in can contain chemicals from your acrylics.
It doesn’t hurt to wear a mask if you will be filing your acrylics at home.
How Can I Shape My Acrylic Nails Without A Drill?
Nail drills are undoubtedly an easier way to shape your nails, but that doesn’t mean using them is necessary.
In fact, nail drills can be dangerous if not used properly. You only need clippers and a nail file to shape your nails at home.
The most common shapes for acrylic nails are:
- Round/oval
- Almond
- Square
- Stiletto
- Coffin-shaped
Now onto the fun part. Here are some helpful steps to follow for shaping your nails that don’t require a nail drill.
- Always work on the length and thickness of your nail first. Grab a pair of clippers and cut your nails to your desired length. Remember, this is to get to your desired length, so don’t worry about shape yet.
- You always want to cut on the outside first; otherwise, you can crack the middle of your nail.
- Use a medium or fine grit to thin your nails to your preference. If your acrylics are still too thick, you want to work on filing them down before deciding on a shape.
- When deciding on the best shape for you, look at your cuticles. If your cuticles are round, a round-shaped nail will look best, while angled cuticles look better with a square shape.
- If the shape doesn’t work out, remember you can opt for a different one next time. Square-shaped nails are likely the easiest to accomplish, and you can always switch them up if you desire. If you start with almond-shaped nails, you probably can’t do much with them until your nails grow out.
Can I File My Acrylic Nails At Home?
If you don’t have time to get to the salon or don’t like how the tech finished your nails, you may be inclined to file them at home. While possible, you need to be careful if you decide to file your acrylic nails at home.
Remember, acrylic nails are thicker than your regular nails, so you want to take your time. You can start with a faster file but then get slower as your nails begin to take shape.
While it might sound daunting, filing your acrylic nails at home is much easier than you may think.
Frequently Asked Questions
Applying acrylic nails at home isn’t easy, but it is possible, and you don’t need an electric file. Always ensure your nails are clean and without polish before applying acrylic nails. The acrylic nails will stay better if you put them on clean nails.
Acrylic nails are harder than most other nails, so you must use a 100/180 grit nail file. An emery board or metal file will work best on acrylic nails.
To reshape your acrylic nails at home, use clippers to cut them to your desired shape and then file until smooth. However, you might have to grow your natural nails a little before reshaping can occur. If you are unhappy with your shape, it might be time for a new set of acrylics.